I thought it would be a great way to create your own wood grain paper for the Counterfeit Kit Challenge, since there is a sheet of wood grain paper in the main kit by Studio Calico.
Start off by getting all of your supplies together for this technique. You are going to need a sturdy surface to work on. You can use heavy cardstock, foam board, cardboard, and my favorite, a big side from a used Priority mailer! You will also need paint brushes, gesso (to prepare your paper or board for this process), several colors of acrylic paints, a heat tool, and Elmers white glue. You may want a paper plate or old tray for your Gesso and paint to make them easier to apply. It would be a good idea to cover the area where you plan on working, because this can get a little messy. Also, I would recommend reading through the instructions once before you start! We are going to take this step by step.
Step #1:
Apply a layer of gesso to your surface. I am using the opposite side of a used Priority mailer. Don't worry about making the edges even, we will do that at the end. I did not go all the way to the edge of my surface, because I planned on cutting it down to smaller than 12 X 12. If you want a larger finished size, take your gesso and paint all the way to the edge. Allow the gesso to dry completely.
 Step #2:
Apply a base coat of acrylic paint. I chose three different colors of brown for my base, because I was going for an aged wood look. I applied the paint in vertical strokes to further simulate the look of wood. You can use an colors you wish, but I would recommend that the base coat and top coat have a lot of variation. In other words, if your bottom layer is dark, make the top layer light, or do the reverse. Also, contrasting colors would work. This layer is going to show through the top layer, and that's why the variation is important. Allow this layer to dry completely.
 Step #3:
(Note: Have your paint for the next step ready to go, because you are will apply the paint over the glue while it is still wet!) Apply a generous layer of glue over your DRY paint. Squirt it directly out of the bottle and cover the entire surface. Then, spread the glue out with your paint brush. It does not have to be perfectly even, because the variations in thickness add to the crackle effect. Immediately go to Step #4, while the glue is still wet!

 Step #4:
Apply a top layer of acrylic paint to the WET glue. I used a tan colored acrylic paint for my old wood effect. This layer of acrylic should be thinned down with water to the consistency of Hershey's chocolate syrup (the kind in the can). Prepare your paint before you do Step #3, and have it ready to go before the glue layer dries. This is crucial to get this effect to crackle properly! When you apply your paint, try not to press too hard, you don't want your paint to mix with the glue, you just want to have it glide right over the top. At this point, you can go immediately to Step #5 if you have a heat tool, or allow the paint to dry naturally.
 Step #5:
Heat the painted surface with your heat tool to speed up the crackle effect. Hold the tool at least 6" to 8" away from the surface and keep moving your tool, or you can bubble the paint (I've done this!). You will begin to see small crackles appear in the surface. It is really fun to watch. After a few minutes, allow your project to dry completely.

 Step #6:
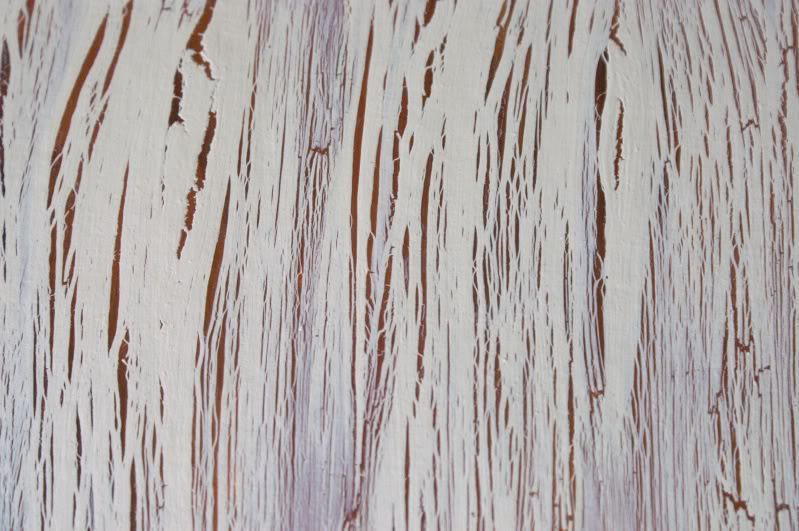
After the surface dries completely, you should see many lines and cracks that have formed all over the top layer of paint. I love this effect! If no cracks have appeared, you may have missed a step. Don't give up! Keep trying until you get it to work, it is so worth it!!! At this point, you will want to cut down your board to the desired size. I used my Basic Grey mat, metal ruler, and an exacto knife.

The Final Project:
I did this layout in an 8" X 8" size, using one of my favorite photos of one of my sons. The little owl was made by tracing out an owl chipboard shape onto the cardboard, then peeling the top layer away, and inking the edges. I used brads for the eyes! It really makes a beautiful page or framed art piece! I hope you give this technique a try!


3 comments:
I love the technique! I've never seen it before. I'll have to try it. Thanks so much!!!! xoxo
I have not been keeping up with everyone's links this month!!! This ROCKS! I'm going to try it :)
*meridy*
thanks for sharing on my to-do list... i've crackled but not for such a woody look and you made it look so easy
Post a Comment